Introduction
Large Language Models in 2025 are more powerful and flexible than ever. Modern foundation models can handle multi-modal input, follow complex instructions, and even perform structured outputs – capabilities that have grown significantly since the early days of ChatGPT. Just as importantly, the ecosystem around LLMs has matured: developer frameworks like the Vercel AI SDK have evolved rapidly, adding support for a wide range of providers and features. The Vercel AI SDK (an open-source TypeScript toolkit from Vercel) reached version 4.1 in early 2025, introducing multi-provider integration and enhanced agent capabilities. These robust SDKs let product teams prototype and ship AI-powered features quickly, with built-in support for streaming, function calling, and tool integrations.
Even with these advances, building an agent requires more than just a clever prompt. An agent is ultimately only as capable as the tools you equip it with and the instructions you give it. A 2025-era LLM can reason impressively, but if it lacks access to the right information or actions, it will still hit a wall. To unlock their full potential, we must furnish LLMs with external tools (for actions and data access) and guide them with clear prompting on how and when to use those tools. In this article, we’ll explore how to build effective LLM agents by going beyond basic prompting: enabling tool use, creating custom tools, ensuring security, adding memory, tracing their behavior, and crafting prompts that tie it all together.
Thinking Beyond the Prompt: Tool Calls
One of the biggest leaps in turning an LLM into an agent is enabling it to perform tool calls. In traditional usage, you feed the model a prompt and it returns an answer – but agents can do much more by taking actions in between thought steps. Tool calls are at the core of this idea: they let the model autonomously call functions or APIs as part of its reasoning process, rather than relying solely on its static knowledge. In LLM parlance, “tool calling” is a broad concept describing an LLM invoking any external capability beyond text generation. For example, an agent might call a calculator tool to do math, query a database for the latest data, execute code, or fetch information from the web. This was foreshadowed by features like OpenAI’s function-calling in 2023, but by 2025 tool use has become a standard technique for building smarter agents.
Tools allow the model to take autonomous actions to gather information or interact with the world, which is essential for any non-trivial agent. Instead of hitting a dead end when its knowledge expires, the LLM can decide, “I need to use a tool to get the answer,” and then produce a structured call to that tool. Modern AI SDKs greatly simplify this integration. For instance, the Vercel AI SDK has first-class support for tool usage and multi-step reasoning. You can register a set of tools when invoking the model, and the SDK will let the model choose to call one. If you allow multiple steps, the model can call a tool, get the result, and then continue the conversation with that new information. By specifying a parameter like maxSteps in Vercel’s API, the LLM is permitted to perform a sequence of tool calls and reasoning steps autonomously, then return a final answer. This means the agent can iteratively plan: e.g. “Search for X, then read result, then answer user.” The SDK handles looping the LLM through tool execution results until the task is complete. In short, tool calls let your agent think beyond the prompt by actively retrieving data or performing operations – all driven by the model’s own decisions during generation. With high-level SDKs and function calling APIs, this capability is easier than ever to integrate into your products.
Building Your Own Tools
Many tasks will be covered by common tools (search engines, calculators, etc.), but a truly effective agent often needs custom tools specific to your app or product. Fortunately, creating tools is straightforward, especially using TypeScript and the Vercel AI SDK. In this SDK, a tool is defined by a name, a description, a schema for its parameters, and an execute function to perform the action. You can even group related tools into classes to maintain state or share resources. For example, let’s build a simple CodebaseTools class that helps an agent interact with a code repository. This class will hold a base directory (acting as a sandbox working directory), and provide two tools: one to list files in a project directory, and one to read the contents of a file.
import { z, tool } from "ai"; // Vercel AI SDK imports
import * as fs from "node:fs";
import * as path from "node:path";

class CodebaseTools {
  private rootDir: string;

  constructor(rootDir: string) {
    this.rootDir = rootDir;
  }

  // Resolve a relative path against the root, preventing access outside the rootDir
  private resolvePath(relPath: string): string {
    const fullPath = path.resolve(this.rootDir, relPath);
    if (!fullPath.startsWith(this.rootDir)) {
      throw new Error("Path is outside the allowed directory");
    }
    return fullPath;
  }

  // Tool: list files in a given directory
  listFilesTool = tool({
    description: "List files in a project directory",
    parameters: z.object({
      directory: z
        .string()
        .describe("Path of the directory (relative to project root)"),
    }),
    execute: async ({ directory }) => {
      const targetPath = this.resolvePath(directory || ".");
      const entries = fs.readdirSync(targetPath, { withFileTypes: true });
      // Return files with '/' suffix for directories
      return entries.map((entry) =>
        entry.isDirectory() ? `${entry.name}/` : entry.name
      );
    },
  });

  // Tool: read the content of a file
  readFileTool = tool({
    description: "Read the contents of a file",
    parameters: z.object({
      filePath: z
        .string()
        .describe("Path of the file (relative to project root)"),
    }),
    execute: async ({ filePath }) => {
      const targetPath = this.resolvePath(filePath);
      const content = fs.readFileSync(targetPath, "utf-8");
      // (Optionally, enforce limits to avoid reading huge files)
      return content;
    },
  });
}
In the above code, we defined two tools as properties of the CodebaseTools class. First, note the private resolvePath helper: it uses Node’s path utilities to combine the given path with the root directory and then checks that the result is still within the allowed root. This prevents malicious or accidental access to files outside the target workspace (for example, it stops inputs like ../secret.txt). Next, the listFilesTool uses fs.readdirSync to list directory entries and returns their names (appending a "/" to directory names for clarity). It takes one parameter, directory, defined by a Zod schema (z.object({...})) to ensure the input is a string. Finally, the readFileTool opens a file and returns its content as text. It expects a filePath parameter. Both tools include a description which helps the LLM understand when to use them, and we rely on the Vercel SDK’s tool(...) helper to create the tool object with proper types. By encapsulating these in a class, we can maintain state (here, the rootDir) and easily instantiate multiple tool sets if needed (e.g. for different directories or projects).
Implementing Tools Securely
When empowering an agent with tools, security and scope control are paramount. Tools should be designed with the principle of least privilege – they should only do what they’re intended for, and nothing more. In our CodebaseTools example, we scoped file access to a specific working directory (CWD). This kind of path whitelisting or sandboxing is critical for file system tools: it prevents the model from reading or modifying files outside the allowed folder. We implemented this by checking that every requested path starts with the known root directory. Similarly, if you provide tools that call external APIs, you might restrict them to certain domains or rate-limit their usage, etc. Always consider what could go wrong if the agent receives a prompt engineered to misuse a tool, and build in safeguards (like the resolvePath check above).
To use our new tools, we instantiate the class with a chosen working directory and pass the tool instances into the LLM call. For example:
// Instantiate tools with a secure root directory
const codeTools = new CodebaseTools("/app/my-project"); // only this folder is accessible

// Invoke the LLM with the tools available
const response = await generateText({
  model: openai("gpt-4"),
  tools: {
    listFiles: codeTools.listFilesTool,
    readFile: codeTools.readFileTool,
  },
  maxSteps: 5, // allow the agent to use multiple tool calls if needed
  prompt: "Find the file that defines our API routes and show its content.",
});
In this snippet, we give the agent two tools (listFiles and readFile) tied to the CodebaseTools instance. The agent’s prompt asks it to find a specific piece of code; if the model doesn’t already know the answer, it can decide to call listFiles to explore directories and then readFile to open a file. Because we set a maxSteps greater than 1, the SDK will permit the model to go through multiple tool usage rounds autonomously. The key detail is that any file paths the model tries will be resolved against /app/my-project – thanks to our secure implementation, even if it attempts a tricky ../ path, the resolvePath will throw an error and prevent a security breach. Always test your tools with edge-case inputs to ensure they fail safely (e.g., our tools could catch and handle errors from fs and return a friendly message to the model instead of crashing). By implementing careful scoping and validation, you can trust your agent with powerful tools without opening up unacceptable vulnerabilities.
Memory Solutions
Another major aspect of an effective agent is how it handles memory and context. Out-of-the-box, LLMs have a fixed context window and they don’t remember anything beyond each conversation (unless you keep supplying the conversation history). For agents that need long-term knowledge or the ability to reason over many facts, you’ll want to integrate external memory systems. Two prevalent approaches in 2025 are vector database retrieval and graph-based memory:
Vector-Based Retrieval (Semantic Memory): This strategy involves encoding knowledge or past interactions into high-dimensional vectors and storing them in a vector database. When the agent needs to recall information, it generates an embedding for the query and performs a nearest-neighbor search in the vector DB to fetch relevant pieces of content. This is often called the Retrieval-Augmented Generation (RAG) pattern. For example, an agent could embed all your documentation or past user queries into a vector index. Upon a new question, it finds the closest matches (by semantic similarity) and injects those into the prompt as context. This gives the LLM a form of extended memory beyond its core training data. Vector-based memory is great for unstructured knowledge and has become a staple for many AI applications because it’s straightforward and scales well with lots of data. The trade-off is that it’s probabilistic: it retrieves information based on similarity, which might not capture logical relationships or exact facts, and the model still has to integrate that info during generation.
Graph-Based Memory (Knowledge Graphs for Deterministic Reasoning): A more structured approach to memory is to use a graph of facts or symbolic knowledge that the agent can traverse. In a graph-based memory, information is stored as nodes and edges (e.g. an entity-relation graph or a network of concepts). This kind of memory excels at representing relationships and enabling deterministic reasoning over them. For instance, if an agent maintains a knowledge graph of a user’s profile and preferences, it can navigate that graph to infer indirect relationships or deduce new facts by following edges. Graph-based memories support sophisticated reasoning processes – an agent can perform path-finding algorithms to discover connections, make logical inferences, and answer complex queries by traversal rather than by fuzzy match. Researchers note that knowledge graphs integrate well with LLM agents by providing a form of “explicit memory” that complements the LLM’s implicit knowledge. In practice, implementing a graph memory might involve a graph database or an in-memory structure that the agent’s tool can query (for example, a custom tool that given two entities finds how they’re linked in the graph). The benefit is determinism and precision – if a fact exists in the graph, the agent can reliably retrieve it via a structured query, which is sometimes preferable to hoping the right vector pops out of a similarity search. The downside is that you need to construct and update the knowledge graph, which can be complex, but for certain domains (like legal or financial reasoning), this investment pays off in more trustworthy and interpretable agent reasoning.
In many advanced agents, a hybrid approach is used: vectors for broad semantic recall of knowledge, and graph or symbolic memory for maintaining state and exact facts. The best solution depends on your use case – but it’s important to remember that LLMs need help with long-term memory. Whether via embeddings or knowledge graphs, equipping your agent with external memory will make it far more effective at handling tasks that go beyond the context window or require persistent knowledge of prior events.
Tracing and Observability
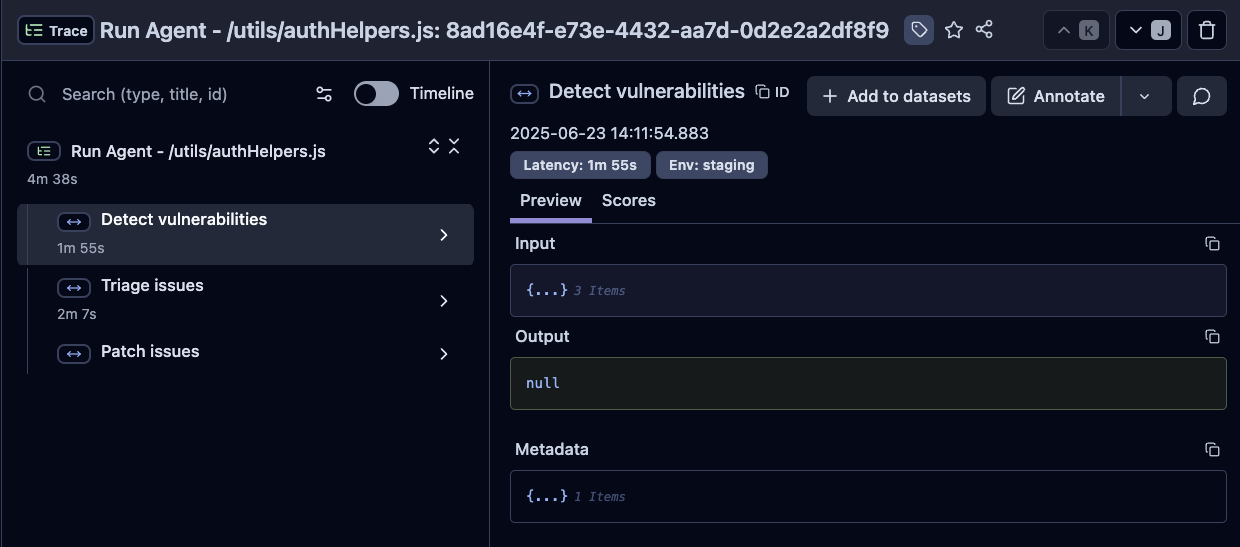
Building a complex agent is one thing – understanding why it behaves a certain way is another. Tracing and observability tools have become indispensable for AI teams to monitor what their LLM agents are actually doing under the hood. As shown above, an agent’s execution can be logged as a trace consisting of multiple steps: for example, the image illustrates an agent first using a retrieval tool (with sub-steps for vector search and context preparation), then proceeding to an LLM generation that produces the final answer. Each of those steps is timed and recorded. By inspecting such a trace, we can identify bottlenecks (e.g. a slow tool call), errors, or reasoning flaws. Without tracing, an agent is a black box that spits out an answer; with tracing, we have full visibility into its decision-making pipeline.
In observability platforms, a trace typically represents one complete execution or session of your agent (for instance, one user query and the agent’s series of actions to fulfill it). Traces are composed of spans, which are individual units of work – these could be an LLM call or a tool invocation or any other sub-task. Notably, LLM inference steps are often logged as a special kind of span, frequently called a generation span, which includes metadata like the prompt given to the model, which model was used, and the output tokens. For example, Langfuse (an open-source LLM tracing platform) defines spans for arbitrary work and specifically tags each model generation as a Generation with associated prompt, completion, and token usage info. By capturing this level of detail, you can see exactly what prompt the agent saw at each step and what it replied – crucial for debugging complex agent behaviors.
Another powerful feature of observability tools is the ability to attach metadata and group traces for analysis. You can label traces with a user ID, session ID, or any custom tags relevant to your app. This allows you to filter and aggregate telemetry – for example, you might examine all traces for a particular user to see why their queries are failing, or compare the cost and latency of traces across different features. Many platforms support this out of the box. For instance, with Langfuse’s SDK you can automatically include custom attributes (like user identifiers or experiment tags) on each trace. This metadata travels with the trace, so later you can query “show me all agent traces for workspace X in the last 24 hours” or link a trace in your application logs to the detailed view in the observability UI. Moreover, traces can often be grouped into higher-level sessions when appropriate (e.g. a multi-turn conversation might generate several traces that you want to correlate together).
Several observability and tracing tools have risen to address LLM applications, each with its own philosophy. Langfuse is a popular open-source solution with a strong focus on detailed LLM tracing for complex agent workflows (it can be self-hosted, which appeals to many teams handling sensitive data). Traceloop, on the other hand, takes a very developer-centric approach by building on OpenTelemetry standards. Traceloop’s OpenLLMetry framework emits traces that can plug into existing telemetry backends, so that your LLM agent’s events can be monitored with the same tools you use for traditional application performance monitoring. There are other players (e.g. Helicone, LangSmith, etc.), but the good news is that the ecosystem recognizes how critical observability is – no matter which solution you choose, instrument your agent. Tracing every step (tool inputs/outputs, model prompts/completions, timing, errors) will save you countless hours when debugging and optimizing your agent. You’ll be able to answer questions like: “Why did the agent take so long? Which tool call failed? What prompt led to this bizarre answer?” by looking at the trace. In a production environment, observability isn’t optional – it’s how you build trust in an AI system.
Prompting for Effective Tool Use
Finally, let’s discuss the glue that holds all these pieces together: prompt design for agents. Giving an agent access to tools is powerful, but the model must know how and when to use those tools. By default, an LLM won’t magically understand your custom tools – you need to engineer the prompt (usually the system message or an extended instruction) to teach the model about its toolset and the protocol for using them. A recommended practice is to include a dedicated “Tool Usage Instructions” section in your prompt. In this section, clearly enumerate each tool available, along with a brief description of what it does and examples of inputs it expects. Essentially, you are giving the model a user manual for its toolbox. For example, you might write in the system prompt:
“You have access to the following tools: (1) Calculator – for math calculations, expects a mathematical expression as input; (2) SearchEngine – for web searches, expects a query string…”
By listing tools in a bullet format with their usage explained, you make it far more likely that the model will pick the right tool at the right time.
In addition to describing tools, specify the exact format the agent should use to invoke a tool. Most frameworks rely on a structured output (like a JSON or a specific string format) to signal a tool call. If the model outputs a plain sentence like “I will use the calculator to add 2 and 2,” that’s ambiguous for the system – instead, we want it to output a machine-readable instruction. So your prompt should include something like: “When you use a tool, respond only with a JSON object of the form: { "tool_name": <name>, "tool_input": <input> }”. You should also instruct that if the model is not using a tool, it should just give a normal answer. By being explicit (e.g. “Do not include any extra text besides the JSON when calling a tool”), you remove ambiguity and make it much easier for your agent’s programmatic wrapper to detect and execute tool calls. Many prompting guides emphasize clarity and even provide a few examples in the prompt so the model is crystal-clear about the expected format.
Crafting these tool usage instructions often involves some iteration and refinement. You want them to be detailed enough that the LLM won’t misunderstand, but not so verbose that they eat up too much of your context window. A few tips: use consistent phrasing for each tool, avoid overlapping functionalities (the model might get confused if two tools sound too similar), and if possible, test the prompt by asking questions that require each tool to see if the model indeed invokes them correctly. Also, keep an eye on the token count - if your tool descriptions are very long, you might consider truncating them or prioritizing the most important tools.
What if you end up with too many tools? One agent with a Swiss-army-knife of 15 tools might sound ideal, but in practice it can overwhelm the model. The more tools you pack into the prompt, the more cognitive load on the LLM to decide among them (and the more tokens consumed by instructions). Researchers and practitioners have found that an agent with an excessive number of tools tends to get confused or make mistakes more often. If your agent’s scope grows that large, it’s probably time to refactor your approach. A good strategy is to break the problem down into multiple specialized agents or an orchestrated multi-agent system. For example, you might have one agent that only handles coding-related tasks with code-specific tools, and another that handles database queries, rather than one monolith with all tools. As one report notes, when subtasks become sufficiently distinct (data extraction vs. report writing, for instance), “it might be time to start separating responsibilities” – using multiple agents each with their own domain-specific toolkits. These agents can then either work in sequence (one hands off to another) or be coordinated by a higher-level orchestrator agent. By doing this, each agent’s prompt is smaller and more focused, which often yields better reliability.
In summary, to prompt effectively for tool use: be explicit, be clear, and don’t overload the model. Give your agent a concise manual for its tools and the exact syntax for using them. Encourage it in the prompt to think step-by-step and use tools when appropriate rather than guessing. And if you find that instruction section growing too large, consider splitting the agent or dynamically selecting a subset of tools per query. With well-designed prompts, your LLM agent will know how to leverage its tools intelligently – following the guidance you’ve provided to decide when to call a tool and when to respond directly. This marrying of good prompting with the right tools and observability is what enables an effective agent: one that can autonomously solve real-world tasks while remaining controllable, safe, and understandable to its creators.